This gold slime recipe is one of my most favorite slimes to make with children! It’s easy to make, even if you don’t know a lot about how to make slime with kids.
Clik here to view.

Related: Monster Slime
My son, my students, and I have been having a little too much fun with slime for years and years now!
It’s incredibly engaging sensory play for the kiddos, along with being an interesting science activity.
Gold Slime Video Tutorial
Here’s a short video showcasing how easy it is to make this gorgeous golden slime.
You can even add things like plastic gold coins to it, especially if you’re incorporating the slime into a pirate theme or a St. Patrick’s Day theme.
Here’s a peek at how to make gold slime with just three simple ingredients:
A Word about Slime Safety
While the kids and I have never had an adverse reaction to these slime ingredients, I can’t account for anyone else’s personal reactions.
Make and play with slime at your own discretion.
Adults need to oversee every part of the process very closely.
If there are any special allergies or skin conditions, take those into account before playing.
No ingredients should be put into anyone’s mouth, nor should any of the slime.
Clik here to view.

How to Make Gold Slime
We used three ingredients to make this gorgeous gold slime, and the kiddos played with it for hours!
I hope you have as much fun with this gold slime as we did!
Here’s how we made it:
Golden Slime Ingredients
5 oz. bottle of Elmer’s Clear School Glue
2 TB Colorations Gold Liquid Watercolor
(Optional) Water
1/2 cup (4 oz. or 8 TB) of Sta-Flo Liquid Starch
Gold Slime Recipe Directions
Start off by placing all of the clear glue into a bowl or cup.
If you'd like to add water, do so at this point by adding warm water to the empty bottle. Shake the bottle up, and then pour the water into the bowl with the glue.
Next, add the gold watercolor to the glue mixture.
Clik here to view.

Be sure to stir it in completely before the next step.
Then shake the liquid starch bottle to make sure nothing's settled to the bottom.
Pour HALF (about 1/4 cup) of the liquid starch into the glue, then stir very well.
Add half of the remaining liquid starch (about 1/8 cup) to the mixture and stir well.
Add the remaining liquid starch and keep on mixin'.
Clik here to view.

Then knead the mixture using your hands. It will feel like thick pudding at first. As kneading progresses, it will transform!
After kneading for a minute, check the stickiness and stretchiness of the slime. Knead for another minute if necessary, but don't over-knead.
If need be, add another tablespoon of liquid starch to the slime and knead for another minute or two.
Be sure to add the liquid starch in small increments or it'll become a clumpy mess!
If you run into any problems with the process, check out Fun at Home with Kids' how to fix slime post.
She has a different glittery slime you might want to check out while you're there.
Clik here to view.

Related: Silver and Gold New Year Slime Recipe
Playing With the Metallic Gold Slime
After the children and I made our golden slime, I set it out on a large white platter.
Then the kids and I jumped right in to play with it!
We swirled it around on the plate, stood on chairs to see how far it would stretch, and had "slime falling races" with each other.
Once the boys had explored the material itself, I added some gold coins to the platter.
Clik here to view.

Related: Princess Slime for a Preschool Fairy Tale Theme
One of the boys enjoyed placing the coins into the slime, then seeing the impressions they left behind.
He was very focused on squishing the coins into the slime, counting the coins, and hiding the coins for the others to find.
Clik here to view.

Related: Gingerbread Butter Slime with Model Magic
The kids absolutely loved stretching the slime up high, then letting it swirl and fall back onto the platter.
The youngest kiddo made a variety of "coin sandwiches" with the slime, telling me to "eat it!" with a giggle. (Of course, I reinforced that we don't really eat slime ever.)
Clik here to view.

Related: Candy Cane Shaving Cream Slime
We took turns loading the slime with gold coins.
Then we'd stretch the slime up high or to the side and watch how many coins remained inside the slime.
The kids had a blast stretching the slime all over the place with me, too!
We found out it would stretch up taller than me (I'm 5'9") and stretch out into the other room.
How to Make Different Types of Slime
This particular slime idea started with a slime-themed chat I had with Asia of Fun at Home with Kids.
I've made slime with my son and my students many times in the past. So when Asia told me about a "Slime Week" challenge, my wheels started churning.
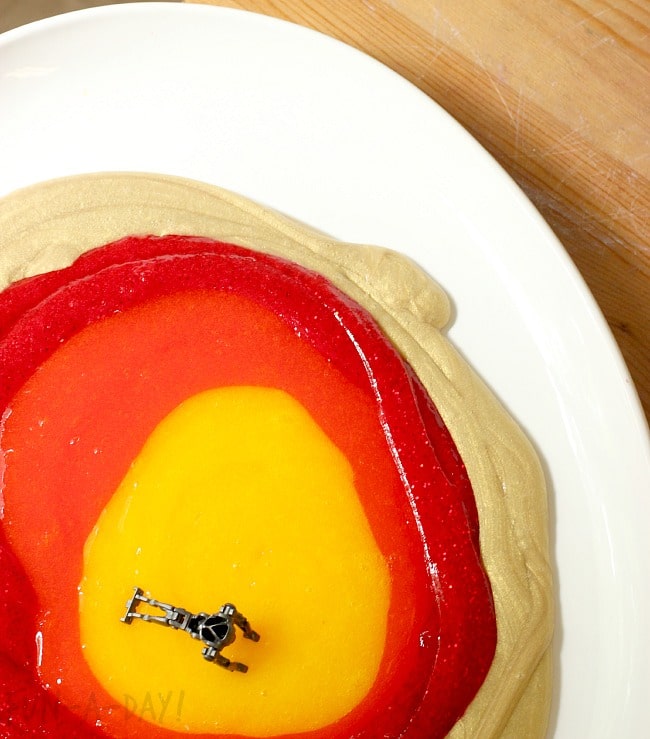
The kiddo and I worked together to create an awesome Lego Star Wars molten lava slime experience. One part of it involved this oh-so-easy gold slime recipe I'm sharing today.
Years later, it's still one of our favorite, go-to slime recipes to make.
If you're looking for even more, you really need to make sure to check out The Ultimate List of Types of Slime from A to Z. You will find TONS of ideas there!
Let me know if you try out our gold slime recipe! I'd love to hear how your kiddo(s) interacted with it.
Originally published on June 24, 2014
Incorporate the Gold Slime into Your Preschool Plans
While I think this golden slime is fun to make at any time, I also think it fits perfectly into certain preschool themes.
Save time and get right to the thematic fun with done-for-you lesson plans from Preschool Teacher 101.
Click on the photos below for more information:
Clik here to view.

Clik here to view.

Clik here to view.

Clik here to view.

The post Gold Slime Recipe Yields Stunning Results appeared first on Fun-A-Day!.